
If you could only do one exercise for the rest of your life, the squat would be the correct answer. No other movement trains as many muscles, builds as much total body strength, or transfers as well to real-world athleticism. But how to squat correctly — with full depth, proper bracing, and safe mechanics — is a skill that takes practice.
Most people squat wrong. They quarter-rep with too much weight, let their knees cave in, round their lower back, or avoid squats entirely because "they hurt my knees." In nearly every case, the problem is technique, not the exercise itself.
This guide covers everything you need to squat safely and effectively: step-by-step form, common mistakes, variations, and programming for both strength and muscle growth.
TL;DR
- The squat trains the quads, glutes, hamstrings, core, and spinal erectors — it is the most complete lower body exercise.
- Stance: shoulder width or slightly wider, toes pointed out 15-30 degrees.
- Depth: at minimum, your hip crease should drop below the top of your knee (parallel). Deeper is better if mobility allows.
- Bracing: big breath into your abdomen, brace your core like you are about to get punched, hold through the rep.
- Common mistakes: knees caving, heels rising, rounding the lower back, and not hitting depth.
- Build a squat-focused program with the free workout planner.
Why the Squat Is the King of Exercises
The squat has earned its reputation as the most important exercise in strength training. Here is why.
Total muscle recruitment. The squat works the quadriceps, glutes, hamstrings, adductors, calves, core, and spinal erectors. No other single exercise engages this many muscle groups simultaneously under heavy load. It is a full lower body workout in one movement.
Functional carryover. Squatting is a fundamental human movement pattern. You squat to sit down, pick things up, play with kids, and get off the floor. Strengthening this pattern improves quality of life at every age.
Hormonal response. Heavy squats trigger a significant anabolic hormonal response due to the sheer amount of muscle mass involved. While the direct effect on muscle growth elsewhere is debated, the systemic training effect of heavy squats is undeniable.
Progressive overload potential. The squat allows you to load more weight than almost any upper body exercise. This means more room for progressive overload and decades of strength progress.
For a complete list of why squats belong in every program, check out our guide to the best leg exercises.
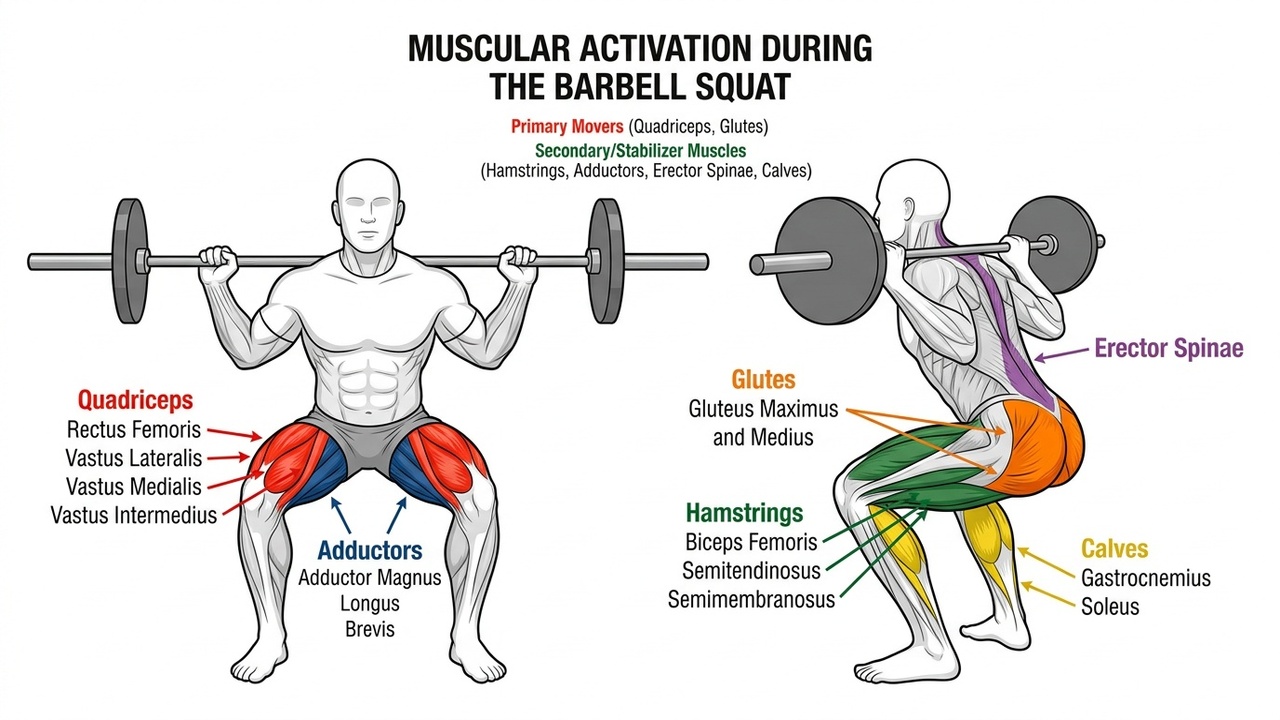
Muscles Worked in the Squat
Primary movers:
- Quadriceps: The main knee extensors. They do the most work driving you out of the bottom position.
- Gluteus maximus: The primary hip extensor. Glute involvement increases as you squat deeper and as you add weight.
- Adductors: The inner thigh muscles assist with hip extension, especially in wider stances.
Secondary movers:
- Hamstrings: Act as knee stabilizers and assist hip extension.
- Erector spinae: Keep your torso upright against the load.
- Core (rectus abdominis, obliques, transverse abdominis): Stabilize the trunk under heavy load.
- Calves: Stabilize the ankle joint throughout the movement.
The squat is one of the best compound exercises because it trains the entire lower body and core in a single movement.
Step-by-Step Squat Form
Step 1 -- Bar Placement (High Bar vs Low Bar)
There are two main bar positions, and the one you choose affects your squat mechanics.
High bar (on top of your traps): The bar sits on your upper traps, at the base of your neck. This is the most common position for general lifters and Olympic weightlifters. High bar allows a more upright torso and deeper squat. It emphasizes the quads.
Low bar (on your rear delts): The bar sits lower, across your rear deltoids and mid traps. This is common in powerlifting. Low bar creates a more forward-leaning torso, shifts emphasis to the glutes and hips, and typically allows heavier loads. It requires more shoulder mobility to get into position.
For most lifters: start with high bar. It is more intuitive, requires less mobility, and builds a strong foundation. Switch to low bar later if your goals or body structure favor it.
Step 2 -- Stance Width and Toe Angle
Stand with your feet shoulder-width apart or slightly wider. Point your toes out at approximately 15-30 degrees. This toe angle allows your knees to track over your toes naturally without caving inward.
Your stance should allow you to squat to full depth comfortably. If your heels rise or your lower back rounds before you reach parallel, your stance may be too narrow or your toes may not be angled out enough.
Wider stances (sumo-ish) emphasize the adductors and glutes. Narrower stances emphasize the quads. Find the width that lets you squat deepest with the most upright torso.
Step 3 -- Unracking and Walkout
Step under the bar, position it on your traps (high bar) or rear delts (low bar), and grip the bar. Your grip should be as narrow as your shoulder mobility allows — a closer grip creates a tighter upper back shelf.
Stand up with the bar by extending your hips and knees simultaneously. Take two to three steps back — no more. One step back with each foot, then one adjustment step to set your stance. Excessive walkouts waste energy and reduce stability.
Set your feet, lock your stance, and take your breath before squatting.
Step 4 -- The Descent
Initiate the squat by breaking at the hips and knees simultaneously. Do not start with just the knees (puts excessive stress on them) or just the hips (turns it into a good morning).
Think about sitting down between your legs, not sitting back onto a chair. Your knees should push out over your toes as you descend. Your torso should stay as upright as possible while maintaining a neutral spine.
Control the descent. Take approximately 2-3 seconds to lower yourself. Do not dive-bomb into the bottom — you lose tightness and increase injury risk.
Step 5 -- Hitting Depth
Minimum depth: your hip crease drops below the top of your kneecap. This is "parallel." Below parallel is even better if your mobility allows it.
Why does depth matter? Squatting to full depth activates significantly more glute muscle than half or quarter squats. Research consistently shows that deeper squats produce greater muscle activation and hypertrophy. Partial squats also increase knee shear force because the quads work without the counterbalancing force of the hamstrings and glutes.
If you cannot hit depth, the issue is usually ankle mobility or hip mobility, not strength. Work on ankle dorsiflexion stretches, hip flexor stretches, and goblet squats to build mobility. Read our stretching routine guide for mobility drills.
Step 6 -- The Drive Up
Drive up out of the bottom by pushing the floor away with your whole foot. Think about pushing the ground apart with your feet — this cue activates your glutes and prevents your knees from caving in.
Keep your chest up and your back angle constant. If your hips shoot up but your chest stays low, the weight is too heavy or your quads are weak relative to your posterior chain. This "good morning squat" pattern is a common mistake covered below.
The drive should be explosive — accelerate through the sticking point (usually around parallel on the way up) and lock out at the top by squeezing your glutes.
Step 7 -- Breathing and Bracing
Before you descend: take a deep breath into your abdomen (belly breathing, not chest breathing). Brace your core hard, as if someone is about to hit you in the stomach. This creates intra-abdominal pressure that stabilizes your spine under load.
Hold your breath through the descent and through the sticking point on the way up. Exhale at or near the top of the rep.
This is the Valsalva maneuver, and it is essential for heavy squatting. Breathing during a heavy squat rep causes your torso to collapse, rounds your back, and dramatically increases injury risk.
For sets of 5+ reps, take a new breath at the top of each rep. Do not rush — re-brace fully before each descent.
Common Squat Mistakes
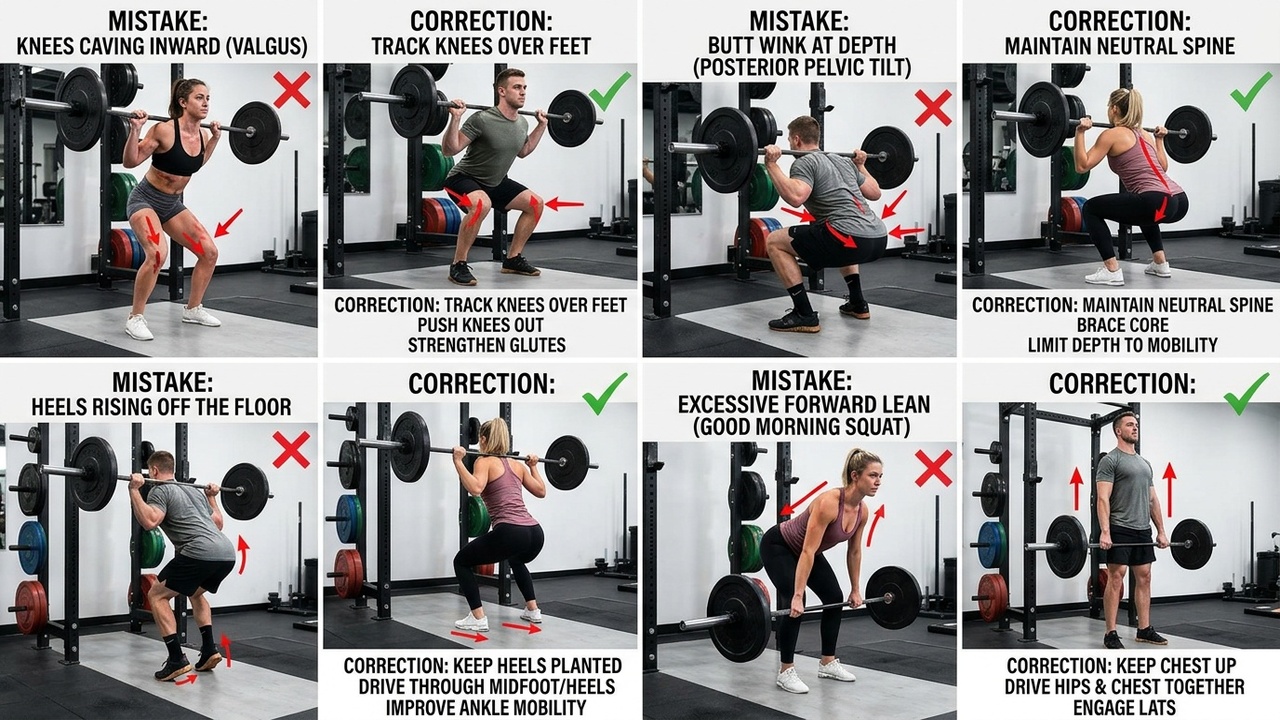
Knees Caving In
When your knees collapse inward during the squat (valgus collapse), it puts dangerous stress on the knee ligaments and reduces force production. This is the most common squat fault and usually indicates weak glutes or adductors.
Fix: Push your knees out over your toes throughout the entire rep. Use the "push the floor apart" cue. Strengthen your glutes with hip thrusts and banded squats. A slight toe-out angle also helps.
Butt Wink
"Butt wink" is posterior pelvic tilt at the bottom of the squat — your tailbone tucks under and your lower back rounds. A small amount is normal and generally harmless. Excessive butt wink under heavy load can cause disc issues.
Fix: Most butt wink is caused by tight hip flexors, tight hamstrings, or squatting too deep for your current mobility. Improve hip mobility with 90/90 stretches and hip flexor stretches. If butt wink starts at a certain depth, that is your current safe depth — squat to that point and work on mobility to go deeper over time.
Heels Rising
If your heels come off the ground, you are shifting the load to your toes and losing balance. This usually indicates limited ankle dorsiflexion (ankle mobility).
Fix: Stretch your calves and ankles regularly. Wear squat shoes with an elevated heel (they give you extra ankle range of motion). Alternatively, place small plates under your heels as a temporary solution while you work on mobility.
Good Morning Squat
When your hips shoot up out of the bottom but your chest stays low, the squat turns into a hip-dominant "good morning" pattern. This overloads your lower back and underloads your quads.
Fix: Reduce the weight and focus on keeping your chest up and your back angle constant through the entire rep. Front squats and pause squats are excellent corrective exercises because they punish forward lean.
Squat Variations
Front Squat
The barbell sits on your front delts with your elbows high. Front squats force an upright torso, making them more quad-dominant and easier on the lower back. They are also self-correcting — if you lean forward too much, the bar rolls off. Excellent for lifters with back issues or those who want to emphasize quad development.
Goblet Squat
Hold a dumbbell or kettlebell at your chest and squat. The goblet squat is the best squat variation for beginners because the front-loaded weight naturally encourages an upright torso, proper depth, and good knee tracking. If you cannot goblet squat with good form, you are not ready for barbell squats.
Bulgarian Split Squat
A single-leg squat variation with one foot elevated behind you on a bench. Bulgarian split squats build single-leg strength, address left-right imbalances, and hit the quads and glutes intensely without heavy spinal loading. They are one of the best leg exercises you can do with just dumbbells.
Box Squat
Squat to a box or bench at your target depth. The box squat teaches consistent depth, eliminates the stretch reflex at the bottom, and builds starting strength out of the hole. Excellent for lifters who struggle with depth consistency or who need to learn to sit back more.
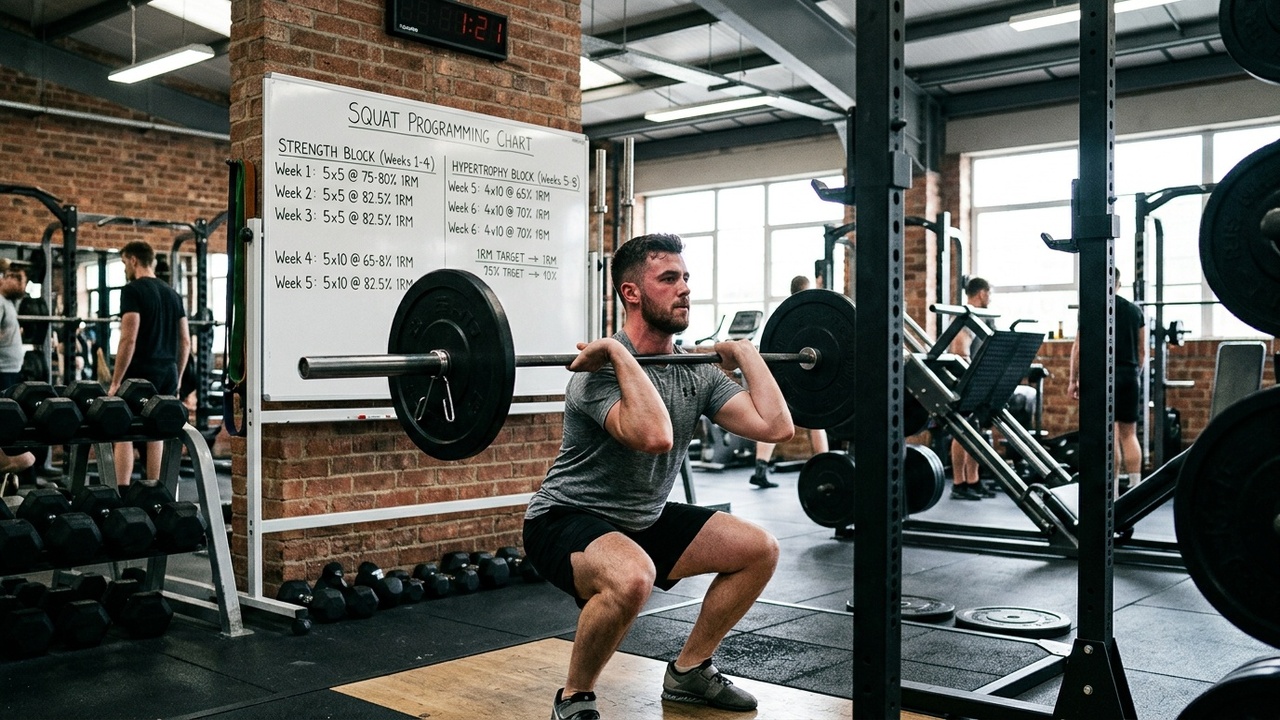
Squat Programs for Strength
| Week | Sets x Reps | Intensity (%1RM) | Rest |
|---|---|---|---|
| 1 | 5 x 5 | 72% | 3-4 min |
| 2 | 5 x 4 | 77% | 3-4 min |
| 3 | 6 x 3 | 82% | 4-5 min |
| 4 | 5 x 5 | 75% | 3-4 min |
| 5 | 5 x 3 | 85% | 4-5 min |
| 6 | Deload: 3 x 5 | 65% | 3 min |
Add 2.5-5 kg per cycle. Supplement with front squats, leg press, and Romanian deadlifts for accessory work.
Squat Programs for Hypertrophy
| Exercise | Sets x Reps | Rest |
|---|---|---|
| Barbell Back Squat | 4 x 8-10 | 2-3 min |
| Bulgarian Split Squat | 3 x 10-12 each | 2 min |
| Leg Press | 3 x 12-15 | 90 sec |
| Leg Extension | 3 x 12-15 | 60 sec |
| Walking Lunge | 2 x 12 each | 90 sec |
Mobility Drills to Improve Your Squat
Poor mobility is the number one barrier to proper squat form. Here are the most effective drills:
Ankle dorsiflexion stretch: Face a wall with one foot about 4 inches away. Push your knee over your toes without lifting your heel. Hold 30 seconds each side.
Deep squat hold (Goblet squat hold): Hold the bottom of a goblet squat for 30-60 seconds. Use the dumbbell as a counterbalance. Push your elbows against your knees to open your hips.
90/90 hip stretch: Sit on the floor with your front leg at 90 degrees and back leg at 90 degrees. Lean over your front leg to stretch the hip. Hold 30 seconds each side.
Couch stretch: Kneel with one knee on the ground and your foot against a wall behind you. This stretches the hip flexors and quads, which are common restrictions for squat depth.
Perform these drills daily or before every squat session. Mobility improvements accumulate — commit to 5-10 minutes of mobility work for lasting improvements. For a complete stretching routine, read our stretching routine guide.
Build a personalized squat program using the free workout planner or find squat variations in the exercise library. Download Load Muscle to track your squat progression over time.
FAQ
How deep should I squat?
At minimum, squat to parallel — your hip crease below the top of your kneecap. Deeper is better if your mobility allows it without butt wink or heel rise. Full-depth squats activate more muscle, build more strength, and are actually safer for your knees than partial squats because the load is distributed across more muscle groups.
Is squatting bad for your knees?
No. Proper squatting strengthens the muscles, tendons, and ligaments around the knee joint. Research consistently shows that squatters have healthier knees than non-squatters. Knee pain from squatting is almost always caused by technique errors (knees caving, heels rising, excessive forward lean) or excessive volume, not the squat pattern itself.
How often should I squat?
Most lifters benefit from squatting 2-3 times per week. This provides enough practice to refine technique and enough volume for strength and muscle gains. Vary the intensity — one heavy day, one moderate day, and optionally one light or variation day (front squat, pause squat).
Should I wear squat shoes?
Squat shoes with an elevated heel are beneficial for most lifters, especially those with limited ankle mobility. The heel raise compensates for ankle stiffness and allows a more upright torso. They are not mandatory, but they make a noticeable difference in squat depth and comfort for many people.
High bar or low bar — which is better?
Neither is objectively better. High bar is more quad-dominant, allows a more upright posture, and is better for most general lifters and bodybuilders. Low bar allows heavier loads, is more hip-dominant, and is preferred by most powerlifters. Start with high bar and experiment with low bar later if your goals warrant it.
Can I squat every day?
Daily squatting (Bulgarian method) is an advanced training protocol that works for some experienced lifters. It requires strict autoregulation — squatting to a daily max based on how you feel, not a prescribed weight. For most lifters, 2-3 squat sessions per week is more practical and produces excellent results with less injury risk.
Now that your squat form is dialed in, put it to work inside one of our strength workout routines built around the big lifts.


