
The deadlift is the simplest exercise in the gym: walk up to a barbell on the floor and pick it up. It is also one of the most technical. Small errors in setup, hip position, or bracing can turn a safe and brutally effective lift into a recipe for a back injury and months on the sideline.
How to deadlift correctly is not something most lifters learn on their own. They watch a few YouTube videos, grab a barbell, and yank it off the floor with a rounded back and shrugged shoulders. The weight goes up, so they assume the form is fine — until it is not.
This guide breaks down the conventional and sumo deadlift step by step, covers grip options, common mistakes, programming, and variations so you can deadlift safely and build serious strength from the ground up.
TL;DR
- The deadlift is the ultimate full-body strength builder, training the glutes, hamstrings, back, core, and grip simultaneously.
- Setup is everything: feet hip-width, bar over mid-foot, hips between shoulders and knees, back flat, lats engaged.
- The bar must stay close to your body throughout the entire pull — if it drifts forward, you lose leverage and stress your lower back.
- Common mistakes: rounding the lower back, hips rising too fast, bar drifting away from the body, and hyperextending at lockout.
- Use the free workout planner to build a deadlift program with proper progression.
Why the Deadlift Is Essential
The deadlift is one of the three powerlifting competition lifts and arguably the most functional exercise you can perform. Picking something heavy off the ground is a movement pattern you use every day — groceries, furniture, children, luggage. Strengthening that pattern makes everything in life easier.
Beyond function, the deadlift is the exercise that allows most people to move the heaviest weight. More weight moved through a full range of motion means more total muscle recruitment, more mechanical tension, and more strength adaptation. There is no other single exercise that trains the entire posterior chain — glutes, hamstrings, spinal erectors, traps, lats — as effectively as the deadlift.
The deadlift also builds mental toughness. There is no bounce, no stretch reflex to exploit, no momentum to cheat with. Every rep starts from a dead stop on the floor. You either have the strength to break the bar from the ground, or you do not. This makes the deadlift an honest test of total body strength and a cornerstone of any serious strength training program.
It responds exceptionally well to progressive overload — even small, consistent increases in weight over months add up to dramatic strength gains that carry over to every other lift in the gym.
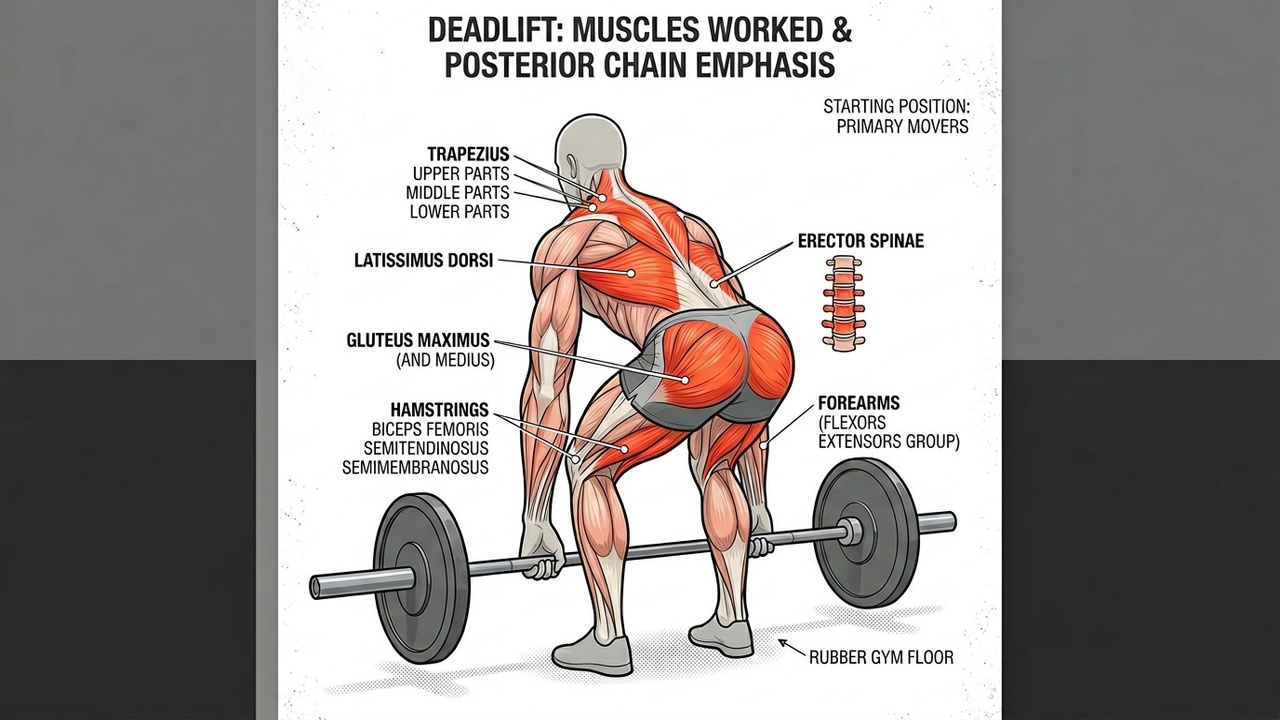
Muscles Worked in the Deadlift
The deadlift is the most complete compound exercise you can perform. Understanding which muscles work and when helps you troubleshoot weak points and cue the lift correctly.
Primary movers:
- Gluteus maximus: The primary hip extensor. Your glutes do the bulk of the work driving your hips forward to lockout. Glute strength determines how much you can deadlift.
- Hamstrings: Work alongside the glutes to extend the hips. The hamstrings are under the most tension during the first half of the pull when your hips are hinged. For more hamstring training, check out our guide to the best hamstring exercises.
- Erector spinae (lower back): Keep your spine neutral against the shearing force of the load. They work isometrically — they do not shorten or lengthen, they resist movement.
- Quadriceps: Drive knee extension during the initial break from the floor. Quad involvement is highest in the bottom position when the knees are bent.
Secondary movers and stabilizers:
- Trapezius and rhomboids: Stabilize the upper back and prevent rounding.
- Latissimus dorsi: Keep the bar close to the body by engaging during the setup and pull.
- Forearms and grip: Hold the barbell against gravity. Grip strength is often the first limiting factor in the deadlift.
- Core (rectus abdominis, obliques, transverse abdominis): Create intra-abdominal pressure to protect the spine.
For a complete breakdown of back training, read our guide to the best back exercises.
Conventional Deadlift: Step-by-Step
The conventional barbell deadlift is the standard version of the lift. Master this before moving to any variation.
Step 1 -- Stance and Foot Position
Stand with your feet hip-width apart — roughly the width you would use to jump straight up. This is narrower than most people think. Your toes should point straight ahead or turned out very slightly (5-10 degrees).
Walk up to the bar until it is over your mid-foot. This means the bar is about one inch from your shins. When you look down, the bar should bisect your foot from above, not sit against your shins and not sit out over your toes.
This mid-foot position is critical. It places the bar directly over your center of balance. If the bar starts too far forward (over your toes), you will lose leverage and your lower back will take excessive load. If the bar starts too close (against your shins before you hinge), your shins will push the bar forward when you bend your knees.
Step 2 -- Grip (Overhand, Mixed, Hook)
Without moving the bar or bending your knees, hinge at the hips and grip the barbell just outside your legs. Your arms should hang straight down from your shoulders — not angled outward.
You have three grip options:
Double overhand: Both palms face you. This is the safest and most natural grip. It is also the weakest because the bar tends to roll out of your fingers at heavier weights. Use this grip for warm-ups and lighter sets, and as long as you can on working sets to build grip strength.
Mixed grip (over-under): One palm faces you, one faces away. This prevents the bar from rolling and immediately lets you hold more weight. The downside is a slight rotational force on your spine and a small risk of bicep tear on the supinated (palm-up) arm. Alternate which hand is supinated each set to reduce asymmetry.
Hook grip: Both palms face you, but your thumbs wrap around the bar first, then your fingers wrap over your thumbs. This is as strong as mixed grip without the rotational force. The trade-off is significant thumb discomfort that takes weeks to adapt to. Most competitive lifters use hook grip.
For most lifters, use double overhand as long as possible and switch to mixed grip when the weight gets too heavy to hold. Consider learning hook grip if you plan to compete or deadlift seriously long-term.
Step 3 -- Hip Hinge and Setup
With your hands on the bar, bend your knees until your shins touch the barbell. Do not push the bar forward with your shins — your shins come to the bar. This is the crucial distinction. The bar stays over mid-foot.
Your hips should now be higher than your knees but lower than your shoulders. This is not a squat — your hips are much higher than a squat position. If your hips are too low, you will try to squat the weight up and the bar will drift forward. If your hips are too high, your back will be nearly parallel to the floor and your lower back will take all the load.
The exact hip height depends on your proportions (torso length, femur length, arm length). The correct position is wherever your back is flat, the bar is over mid-foot, and your shoulders are slightly in front of the bar when viewed from the side.
Step 4 -- Bracing and Lats
Before you pull, you need to lock in two things: your brace and your lats.
Bracing: Take a deep breath into your abdomen — belly breathing, not chest breathing. Brace your core hard, like someone is about to punch you in the stomach. This creates intra-abdominal pressure that acts like a natural weight belt, protecting your spine under heavy load. Hold this brace through the entire rep.
Lat engagement: With your arms straight, think about "putting your shoulder blades in your back pockets" or "bending the bar around your shins." These cues activate your lats, which serve a critical function in the deadlift: they keep the bar close to your body. If your lats are not engaged, the bar drifts forward, your lower back rounds, and the lift becomes dangerous and inefficient.
You should feel tightness from your hands through your lats and into your hips before the bar leaves the floor. If anything feels loose, reset and re-brace. Never pull from a loose position.
Step 5 -- The Pull
This is not a "pull" in the traditional sense. Think of it as pushing the floor away with your legs while keeping your back angle constant. The initial movement off the floor is driven by leg drive — your knees straighten as your quads engage.
The bar should travel in a straight vertical line, staying in contact with (or extremely close to) your legs the entire way up. It will scrape your shins and slide up your thighs. This is normal. Wear long socks or pants if the abrasion bothers you.
As the bar passes your knees, your hips drive forward to meet the bar. This is where the glutes and hamstrings do their heaviest work. The transition from leg drive to hip drive should be seamless — do not pause at the knees or change your pulling speed.
A critical cue: your hips and shoulders should rise at the same rate off the floor. If your hips shoot up first while your shoulders stay low, the bar drifts forward and your back rounds. If this happens, the weight is too heavy or your quads are the weak link.
Step 6 -- Lockout
The lockout is complete when you are standing fully upright: hips fully extended, knees locked, shoulders behind or directly over the bar, chest up. Squeeze your glutes hard at the top to drive your hips into the bar.
Do not lean back past vertical. A slight lean back is fine, but excessive hyperextension at the top compresses your lumbar spine and serves no purpose. Stand tall and straight — that is the lockout.
Do not shrug the bar at the top. Your traps should be relaxed at lockout. Shrugging adds unnecessary fatigue and does not count for a complete lift in competition.
Step 7 -- Lowering the Bar
The descent is the reverse of the pull: hinge at the hips first, push your hips back, and lower the bar along your thighs. Once the bar passes your knees, bend your knees to lower the bar to the floor.
Control the descent but do not lower the bar slowly. A controlled drop is safer and more efficient than a 3-second negative, especially at heavy weights. Your lower back does not need the additional time under tension on the eccentric.
Let the bar come to a complete stop on the floor before your next rep. Every rep should start from a dead stop — no touch-and-go bouncing. Resetting between reps ensures you maintain proper position and brace for every pull.

Sumo Deadlift Form
The barbell sumo deadlift uses a wide stance with your hands inside your legs. It is not a "cheater" deadlift — it is a legitimate variation that suits certain body types and targets the muscles differently.
Stance: Set your feet wide — roughly 1.5 to 2 times shoulder width — with your toes pointed out at 30-45 degrees. Your exact stance width depends on your hip mobility and femur length.
Grip: Grip the bar at shoulder width or slightly narrower, with your arms hanging straight down inside your knees. Use the same grip options as conventional (double overhand, mixed, or hook).
Setup: Drop your hips down and bring your torso more upright than conventional. Your shins should be roughly vertical, and your knees should track over your toes (pointing the same direction as your feet). Your hips will be closer to the bar and lower than in conventional.
The pull: Drive your feet into the floor and push the floor apart. The sumo deadlift relies more on hip abduction and quad drive off the floor. Keep the bar close to your body and drive your hips through as the bar rises.
Lockout: Same as conventional — stand tall, hips extended, glutes squeezed. Sumo lockout is typically shorter because the hips start closer to the bar.
The sumo deadlift places less stress on the lower back and more on the quads, adductors, and glutes. It also reduces the range of motion, which some lifters interpret as "easier." In reality, the sumo deadlift is harder off the floor and easier at lockout, while the conventional is easier off the floor and harder at lockout. The total work is comparable.
Common Deadlift Mistakes
Rounding the Lower Back
This is the most dangerous and most common deadlift mistake. When your lower back rounds under load, the stress shifts from your muscles to your spinal discs and ligaments. This is how disc herniations happen.
Why it happens: The lifter sets up with hips too high, does not brace properly, has weak erectors, or simply uses too much weight.
Fix: Film yourself from the side. Your lower back should maintain a neutral curve (slight inward arch) from setup through lockout. If it rounds, reduce the weight until you can maintain a flat back through every rep. Strengthen your back with barbell bent-over rows and back extensions. Practice bracing before every rep.
Note: some upper back rounding is acceptable and common in heavy pulling, especially in experienced lifters. Lower back rounding is never acceptable.
Hips Rising Too Fast
When the bar breaks from the floor and your hips shoot up while your shoulders stay in place, the deadlift turns into a stiff-leg deadlift. Your back angle becomes horizontal and your lower back takes the entire load.
Why it happens: Your quads are weak relative to your posterior chain, or you set up with your hips too low (trying to squat the weight up). When the quads fail to drive the initial leg press portion, the body compensates by raising the hips to shift the load to the back and hamstrings.
Fix: Set your hips at the correct height — higher than a squat, lower than a stiff-leg deadlift. Think about pushing the floor away with your legs while keeping your chest up. If your hips still shoot up, strengthen your quads with barbell squats and leg presses.
Bar Drifting Forward
If the bar moves forward away from your body at any point during the lift, you have lost your leverage. The further the bar drifts from your center of mass, the longer the moment arm, and the more your lower back has to work to compensate.
Why it happens: Starting with the bar over your toes instead of mid-foot. Not engaging your lats. Pushing your shins into the bar during setup (moving it forward). Trying to look up or forward during the pull, which shifts your weight forward.
Fix: The bar should start over mid-foot and stay in contact with your body throughout the pull. Engage your lats by "bending the bar around your shins." Look at a spot 6-10 feet in front of you on the floor — not at the ceiling, not at the mirror, not at the bar. The bar will drag up your shins and thighs. If you can feel the bar on your legs, it is in the right position.
Hyperextending at Lockout
Leaning back excessively at the top of the deadlift is a common mistake, often done because lifters think they need to "over-lock" the rep. This compresses the lumbar vertebrae and serves no purpose — in competition, it can even red-light a lift.
Fix: Lock out by standing straight and squeezing your glutes. Your body should form a vertical line at the top. If you need to lean back to finish the lift, the weight is too heavy or your glutes are weak. Think "tall" at the top, not "back."

Deadlift Variations
Romanian Deadlift
The barbell Romanian deadlift starts from the top (standing position) and lowers the bar to mid-shin level without touching the floor. Unlike the conventional deadlift, the emphasis is on the eccentric (lowering) phase and the deep stretch at the bottom.
The Romanian deadlift is the best hamstring and glute builder in the gym. Keep a slight bend in your knees (15-20 degrees), push your hips back, and lower the bar along your legs until you feel a strong stretch in your hamstrings. Your back stays flat throughout. This exercise belongs in every back and posterior chain workout.
Trap Bar Deadlift
The trap bar deadlift uses a hexagonal bar that you stand inside. Your hands grip handles at your sides rather than in front of your body. This puts less stress on the lower back, allows a more upright torso, and shifts emphasis to the quads.
The trap bar deadlift is excellent for beginners, athletes who want deadlift strength without excessive lower back fatigue, and anyone returning from a back injury. It allows most people to lift more weight than a conventional deadlift because of the improved leverage.
Deficit Deadlift
The barbell deadlift from deficit is performed while standing on a raised surface (1-3 inches), increasing the range of motion at the bottom. This makes the lift harder off the floor by requiring more knee bend, more quad drive, and a lower hip position.
Deficit deadlifts are an excellent accessory for lifters who struggle to break the bar from the floor. They also build positional strength in the bottom range and improve your setup consistency. Use 10-20% less weight than your conventional deadlift.
Block Pull
The barbell sumo deadlift from blocks (or conventional block pull) is the opposite of the deficit deadlift — the bar starts on elevated blocks, reducing the range of motion. This overloads the lockout portion of the lift.
Block pulls are useful for lifters who struggle with lockout, for training the upper back and traps under supramaximal loads, and for building confidence with heavier weights. Set the blocks at knee height or slightly below for the best training effect.
Conventional vs Sumo: Which to Choose?
This is one of the most debated topics in strength training. The honest answer: it depends on your body and your goals.
Choose conventional if:
- You have a shorter torso and longer arms (favorable leverage)
- You want maximum posterior chain development (glutes, hamstrings, back)
- You compete in strongman (sumo is generally not allowed in competition)
- You feel stronger and more comfortable in a narrow stance
Choose sumo if:
- You have a longer torso and shorter arms
- You have good hip mobility and strong adductors
- You want to reduce lower back stress
- You feel stronger and more comfortable in a wide stance
The best approach for most lifters: Train both. Use one as your primary competition or strength lift, and use the other as an accessory. Many lifters alternate between conventional and sumo in different training blocks. Both build strength, both build muscle, and both make the other one better.
Body proportions matter more than anything else. A lifter with long femurs and a short torso will often struggle with conventional form because their back angle is nearly horizontal. That same lifter may find sumo far more natural. The reverse is true for lifters with short femurs and long arms.
Try both for at least 4-6 weeks each with proper technique before deciding. Film yourself from the side and compare your back angle, hip position, and bar path.
Deadlift Programming for Strength and Size
The deadlift is more taxing on the central nervous system than the squat or bench press. It fatigues the lower back, grip, and posterior chain in ways that require longer recovery. Most lifters do best with 1-2 deadlift sessions per week, not more.
For strength (peaking):
| Week | Sets x Reps | Intensity (%1RM) | Rest |
|---|---|---|---|
| 1 | 5 x 5 | 70% | 3-4 min |
| 2 | 5 x 4 | 75% | 3-4 min |
| 3 | 5 x 3 | 82% | 4-5 min |
| 4 | Deload: 3 x 5 | 60% | 3 min |
| 5 | 4 x 2 | 87% | 5 min |
| 6 | 3 x 1 | 92% | 5 min |
Add 2.5-5 kg per cycle. Supplement with Romanian deadlifts, barbell rows, and front squats for accessory work.
For hypertrophy:
| Exercise | Sets x Reps | Rest |
|---|---|---|
| Conventional Deadlift | 3 x 6-8 | 3-4 min |
| Romanian Deadlift | 3 x 10-12 | 2-3 min |
| Barbell Bent-Over Row | 3 x 8-10 | 2 min |
| Back Extension | 3 x 12-15 | 90 sec |
| Farmer's Walk | 3 x 40m | 2 min |
For hypertrophy, the conventional deadlift serves as the heavy compound movement, followed by accessories that target the same muscle groups from different angles and rep ranges. Keep the deadlift rep range moderate (6-8) rather than high (15+) to avoid form breakdown from fatigue.
Progression tips:
- Film every heavy set from the side to monitor form
- Never increase weight at the expense of a flat back
- When you fail a rep, reduce weight by 10% and build back up
- Grip failing before your back and legs? Add dedicated grip training or use straps for top sets and save bare hands for back-off sets
Build a personalized deadlift program using the free workout planner, or find the deadlift and all its variations in the exercise library. Download Load Muscle to track your deadlift progress and monitor your strength gains over time.
FAQ
How often should I deadlift?
Most lifters get the best results from deadlifting 1-2 times per week. The deadlift is extremely taxing on the central nervous system and lower back, so it requires more recovery than most exercises. If you deadlift twice per week, vary the intensity — one heavy day and one lighter technique or variation day.
Is the deadlift safe for beginners?
Yes, when performed with proper form and appropriate weight. The deadlift is one of the most natural movement patterns — picking something up off the ground. Start with an empty barbell or light weight, film yourself to check form, and increase weight only when your technique is consistent. Consider the trap bar deadlift as a beginner-friendly alternative.
Should I use a belt for deadlifts?
A lifting belt is useful once you are handling weights above approximately 80% of your one-rep max. The belt gives your core something to brace against, increasing intra-abdominal pressure and spinal stability. It does not replace core strength — you still need to brace hard. Train without a belt on warm-ups and lighter sets to build core strength, and use a belt for heavy working sets.
Why does my lower back hurt after deadlifts?
Some lower back fatigue after heavy deadlifts is normal — the erector spinae work hard to keep your spine neutral under load. However, sharp pain, pain that lasts more than 48 hours, or pain during the lift indicates a form problem. The most common causes are lower back rounding, hips rising too fast, and starting with the bar too far from your body. Reduce the weight, film your sets, and correct your form before adding weight back.
Can I deadlift and squat on the same day?
Yes, but the order and intensity matter. If your priority is squats, squat first and follow with lighter deadlifts or a variation like Romanian deadlifts. If deadlifts are the priority, deadlift first. Many effective programs pair heavy squats with light deadlifts and vice versa on alternating days. The key is managing total lower back and posterior chain fatigue across the week.
Once your deadlift technique is solid, plug it into a structured program — our strength workout routines are built around the big compound lifts.


